Cabling and Installing OSN Server Platform
This section is intended for customers who wish to install the optional Open Solution Network (OSN) server platform functionality. The OSN platform allows you to host third-party applications such as an IP PBX, Pre-Paid, and IP PBX redundancy.
The OSN platform includes a hard disk to provide a complete solution within the device's chassis. The OSN is based on single and mid-sized Advanced Mezzanine Card / AMC (AdvancedMC form-factor) modules. These are housed in the chassis' AMC slots on the rear panel.
The OSN can run on Linux™ or Microsoft Windows® operating systems. To install an operating system on your OSN4B server, follow the procedure below.
| ➢ | To install the operating system on OSN4B: |
| 1. | Disconnect the power cord from the power source, and then remove the power cord from the power connection on the power socket. |
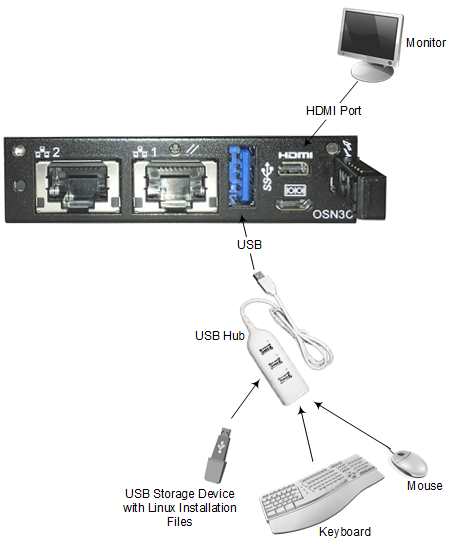
| 2. | Connect the USB port, located on the module, to a USB hub, and then connect the USB hub to the following computer peripherals: |
| ● | Mouse |
| ● | Keyboard |
| ● | USB storage device containing the operating system installation files (disk-on-key or external CD-ROM or DVD-ROM drive). |
| 3. | Connect the HDMI port, located on the OSN module, to your monitor. |
Cabling OSN4B Module for Installing Operating System
| 4. | Reconnect the device to the power source; the OSN server boots up from the USB storage device and the operating system installation begins. |
| 5. | Follow the online installation instructions to install the operating system. |
The HDMI-to-HDMI cable adaptor is shown below with connector pinouts.
Standard HDMI (Type A) to Micro HDMI (Type D) Cable Adaptor

Micro-HDMI Type-D Connector Pinouts
|
Pin |
Signal |
|---|---|
|
3 |
TMDS Data2+ |
|
4 |
TMDS Data2 Shield |
|
5 |
TMDS Data2- |
|
6 |
TMDS Data1+ |
|
7 |
TMDS Data1 Shield |
|
8 |
TMDS Data1- |
|
9 |
TMDS Data0+ |
|
10 |
TMDS Data0 Shield |
|
11 |
TMDS Data0- |
|
12 |
TMDS Clock+ |
|
13 |
TMDS Clock Shield |
|
14 |
TMDS Clock- |
|
15 |
CEC |
|
2 |
Utility/HEAC+ |
|
17 |
SCL |
|
18 |
SDA |
|
16 |
DDC/CEC/HEAC Ground |
|
19 |
+5 V Power |
|
1 |
Hot Plug Detect/HEAC |